Terry's GIS Studies and Transition to a New Career

Showing posts with label Classes. Show all posts

Wednesday, April 8, 2020

Module 6--Isarithmic Mapping

In this module, I learned about isarithmic mapping, which is a mapping method to present smooth, continuous phenomena such as precipitation, elevation, barometric pressure, etc. Besides the choropleth map, isarithmic maps are the most common, with the contour map being the most common isarithmic map.

In this lesson, I produced two maps. The data was obtained from the USDA Geospatial Gateway in raster format. The data had been prepared using Parameter-elevation Relationship on Independent Slopes Model (PRISM), which conducts a regression function between elevation and precipitation (in this case) for each digital elevation model (DEM) grid cell. Data obtained from monitoring stations are waiting based on their similarity to the grid cell. This has greatly improved data modeling and weather prediction.

The first map was a continuous tones isarithmic map that displayed average annual precipitation from 1981 to 2010 in Washington. Because it used continuous tones (stretching in ArcGIS Pro), it was much like a proportional symbols map in that the data was automatically converted into a color ramp which the program directed the stop points. Only the lower and higher numbers were displayed in the legend. I added the hillshade function to incorporate elevation into the map and adjusted its color ramp by editing each color stop by hue, transparency, and position on the ramp. Completion of the map was not required as it served more as a teaching tool and the origin of the hypsometric map.

Continuous Tones Map Isarithmic Map Depicting Annual Average Precipitation in WA

Once the continuous tones map was complete, I then produced a hypsometric tints map, displays contour lines between colors. This product started with copy/pasting the raster images from the continuous tones map. I then used the INT (Spatial Analyst) tool for the precipitation raster to convert the cell values to an integer. Using the precipitation color ramp, I classified the data into 10 classes. Because the class intervals were directed in the assignment, I used the manual function in the symbology pane.

I then created contours using the Contour List tool and aligned their intervals with the same intervals as the precipitation raster. The result was the contour lines appearing (in blue in the below map) between each color. The resulting final product is displayed below:

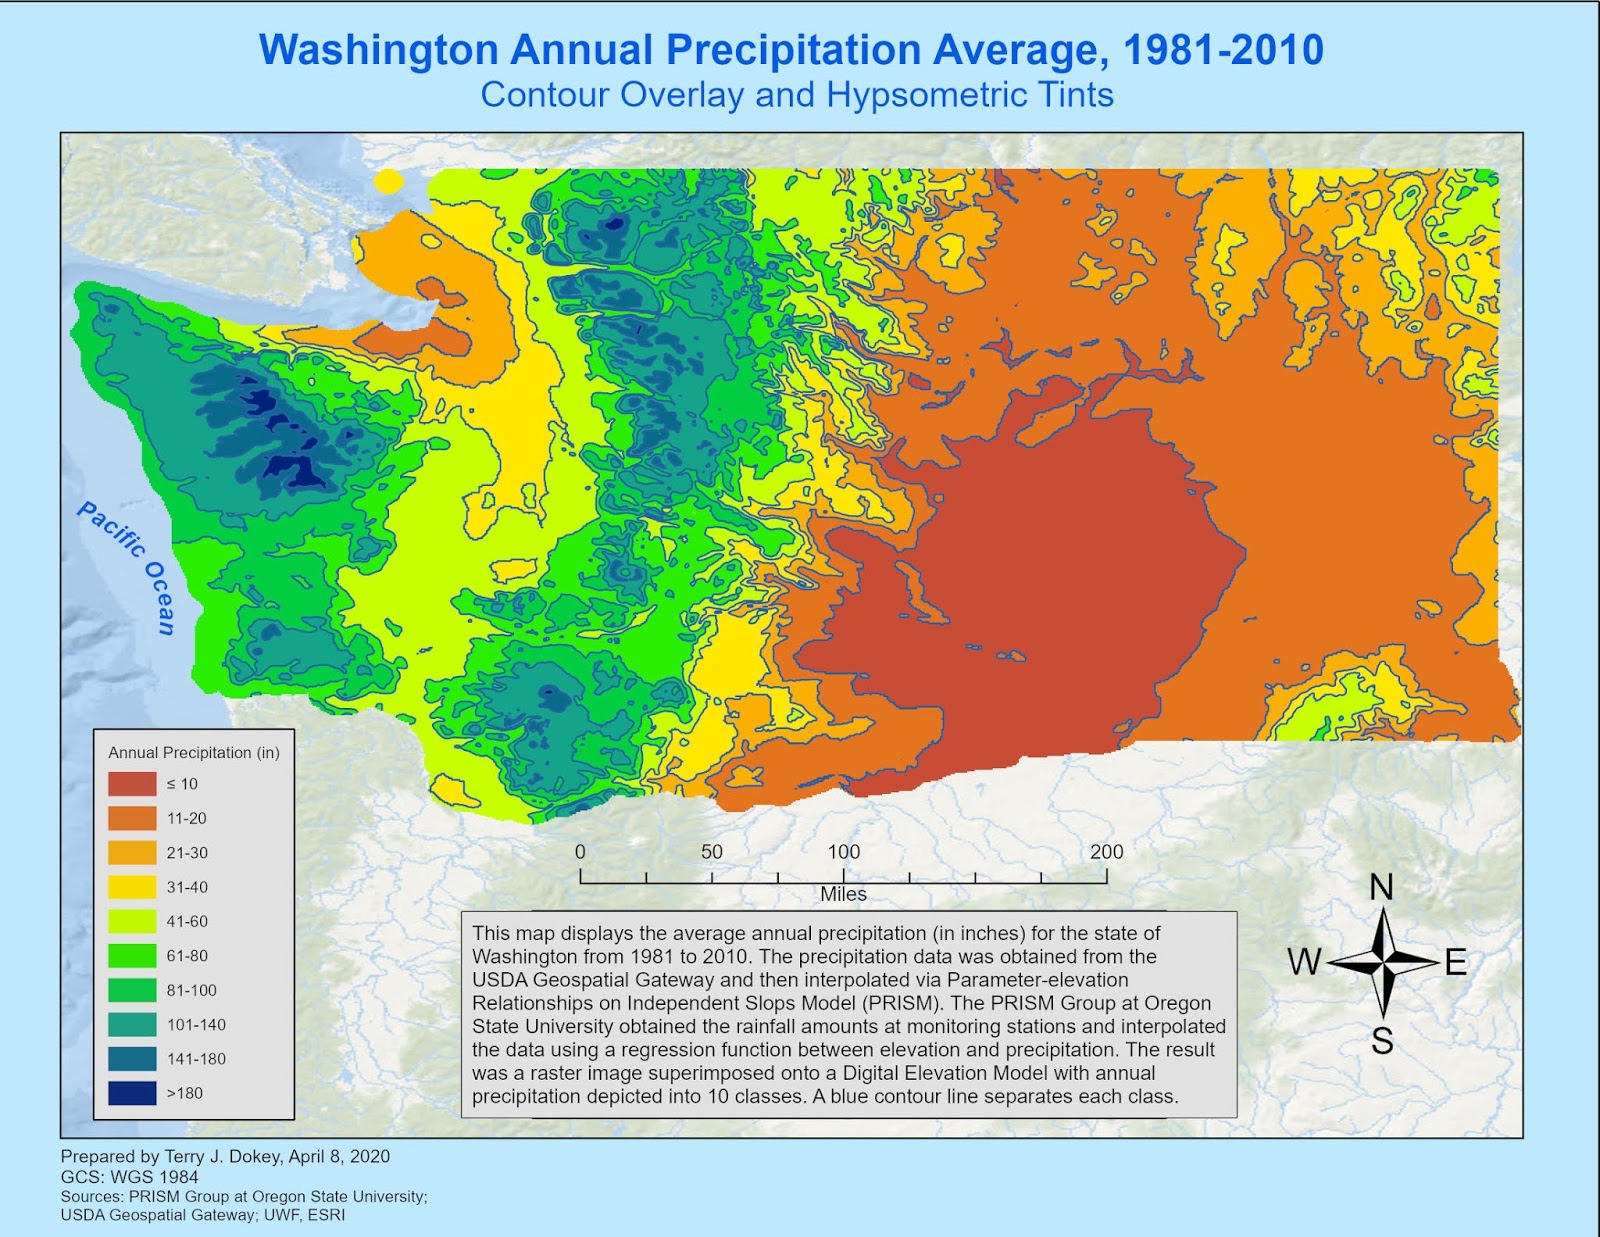
Hypsometric Tints Isarithmic Map Depicting Annual Average Precipitation in WA
The final Hypsometric Tints map with contour overlay displays 10 classes of precipitation data that was collected from 1981 to 2010. All essential map elements are in place and I added a description box to further explain the map. All in all, it was a very straightforward lab assignment that provided more exposure and experience with raster images.

Saturday, April 4, 2020

Module 5--Choropleth Mapping

For this module, I produced a choropleth map that showed the population density of European countries along with wine consumption per capita. The task was to properly show both variables on the map using either proportional or graduated symbols. For extra points, I chose to use pictures of wine bottles in lieu of the default template (circles).

For the data display, I chose to use graduated symbols and the quantile data method with four classes. I did not need to normalize the data, because the data was already normalized in the attribute table (wine consumption per capita). To me, the quantile data method with four classes provided the best granularity to perceive and understand the differences in each variable. Additionally, I excluded four countries from the data set because they were outliers--high population density, tiny area, insignificant wine consumption. Additionally, the graduated symbols were easier to manipulate than proportional symbols. For proportional symbols, I had to set the lower limit and the sizes were manipulated automatically. For graduated symbols, I could manipulate the size for each class individually to ensure the viewer could perceive differences.

For the actual map, I used the Albers Equal Area Conic Projection because it was important to maintain the area throughout the map when comparing/analyzing data that has an areal perspective. I chose to use a purple color ramp to display population density because it reinforced and complemented the overall theme of the map--wine consumption. I also added an inset map to show the Balkans area, as this was too crowded on the main map to be usable.
Population Density and Wine Consumption (per capita) in Europe
I prepared most of the map in ArcGIS Pro. The biggest challenge was importing the wine bottles. In order to import the bottles, I found free, non-attribution clip arts that were in .svg form. I then imported the bottle and manipulated the size and other aspects to ensure that they would be added just like any other graduated symbol. In order to move the wine bottles, I converted the wine bottle symbols to graphics, which allowed me to move them. I did the same with the text to ensure there was no overlap and everything was sized appropriately.

For my base map, I used the Ocean base map in ArcGIS Pro. I then added bold italics names for each main body of water, though I altered the size based on the magnitude of the body of water. I also curved or bent my text to convey water flow.

Once all my essential map elements were complete, I then saved it as a .pdf because ArcGIS Pro no longer has the functionality to export to Adobe Illustrator. Once saved as a .pdf, I then opened a new project in AI from the .pdf file. I then touched up and added higher level graphics through AI: Moved wine bottles and names, added drop shadows to Atlantic Ocean, added inner halo in legend and other text boxes. I wanted to add an inner halo to the countries; however, this would cause issues with interpreting the population density. If this were just a regular map (not graduated), I would have added an inner halo.

The biggest issue for manipulating features in AI from a .pdf is that there are hundreds of components nested many times that you must manipulate. You must also control/click each component of the feature to ensure all are manipulated the same. For instance, I had a halo around the countries on the main map. In order to resize or move a country's name, I had to click on numerous components so that they were all changed in the same way.

 My advice to everyone is to be meticulous and systematic, especially when manipulating so many different features. I chose to pick a group of features and toggle between visible/not visible to locate it and then I manipulated as needed. Once I finished I went to the next feature in the right pane. Otherwise, it would be very frustrating to find the features by clicking on the map.

Overall, though very tedious, this was a fun exercise and I learned quite a bit. I can definitely tell that my competence and confidence have improved.