Terry's GIS Studies and Transition to a New Career

Showing posts with label row. Show all posts

Sunday, June 21, 2020

Module 6--Working with Geometries

Because of COVID, we were only required to do the last two modules. I completed M7 first, because it seemed easier.

In this module, I had to work with nested loops, search cursors, For Loops, and writing to text files for a system of rivers in Hawaii. The lab was very confusing and you definitely needed to use a pseudocode and to break up the lab into small parts. However, the exercise provided a base of knowledge from which to build upon.

Below are the results of the text file, which returned the Feature ID, Vertex ID, X and Y Coordinate, and the name of the feature:
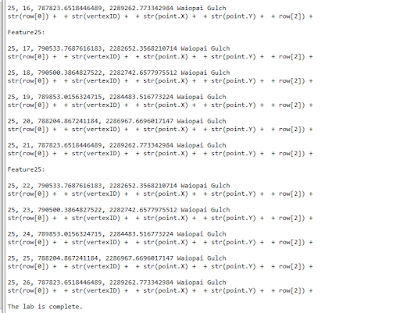
Screenshot Showing OID, Vertex, X/Y Coordinates, and Name


Below is the pseudocode:


Start
               Import arcpy
               Import env from arcpy
               overwrite output = true
               workspace = “S:\GISProgramming\Module6\Data”
    new text file = “rivers_TJD.txt” (use the write function, “w”)
    fc = “rivers.shp”
               cursor = arcpy.da.SearchCursor(fc, [OID@, SHAPE@, NAME])
               use for loop through the cursor for each point
               vertex = 0
               vertex += 1
               f.write the results to the text file
               print results
               close text file
               delete row
               delete cursor
               print statement: The lab is complete
End


As always, take it one step at a time and look closely at indents, spaces, and other small issues to prevent syntax errors. Ensure you enable the overwrite function so you do not get the error code if you have to start another portion of the script again. Remember to think of the information you write as a table of columns and rows. Of course, the columns are the headers, OID, Vertex, X Coord, Y Coord, Name, etc. The rows are the actual features. Therefore, when you iterate over the loop, you are using {} to identify each column (e.g., {0} will be OID, {1} will be vertex, etc.).

Friday, June 12, 2020

Module 5--Exploring and Manipulating Data

Well, I can guarantee that I am not quitting my day job. Though the lab started out easily, I got hung up on populating the dictionary. I probably spent 16 hours or more just one that one small step. After I finally figured out the issue, which was that by adding the update, get value statement for keys and values, and the key:value format statement within the for loop, everything printed out as required. I figured this out by commenting out lines of code and then adding new lines to see what happened. I eventually worked through the issues. Of course, viewing the student questions site on Canvas also assisted. Believe me, I contributed to the questions, but I also shared my solution.

The lab worked sequentially and built upon each step. Beginning with creating a new file geodatabase, I then assigned my feature classes to "fclist." I then copied these FCs to the new fGDB using a "for loop" (and also stripped out the .shp extension). Between each step, I learned how to add statements showing the date, time, and the amount of time the computer needed to complete the step. I also used "\n" to make sure lines were skipped for ease of viewing.

This screenshot shows the first several steps of the lab, to include the commentary: Create fGDB, copy Feature Classes, and creating a search cursor that returns county seats. The list of county seats is truncated to save space, but the code shows the information for all the county seats.
I then used a search cursor to sort out all the cities that were considered county seats in the feature column of the table. The only information I needed for this exercise was the name of the city, the feature, and the 2000 population.
Screenshot of the end of the county seat information. The dictionary is populated in the correct format {key:value}. Statements say how long it took, when the process finished, and the lab was complete.

Once I got the dictionary to print, the lab was complete. Though the lab was a challenge, I learned a lot.

A few words of advice:
--delete the row and cursor once you complete a loop.
--use \n so there is a line break.
--use print(arpy.GetMessage(count-1)) to get the date/time/process time for each line.
--don't forget the # symbol to add a comment.
--make sure ArcGIS Pro is not running at the same time as Spyder or you will likely get an error message.
--use the overwrite argument to reduce the amount of errors you receive saying that the fGDB exists (env.overwriteOutput=True).
--comment out lines of code (sometimes I put different numbers of # marks to keep myself straight) and try new lines. This way, you don't make a change and forget how to reverse it.