Terry's GIS Studies and Transition to a New Career

Showing posts with label Intersection. Show all posts

Thursday, February 27, 2020

Criteria 2--Homes and Parcels

For criteria 2, I quantified the number of homes and parcels impacted by the transmission line. I relied heavily on the U.S. Census Bureau TIGER files and imported edges and addresses. I also downloaded data from the Sarasota and Manatee Counties Assessors' Offices to obtain updated information.

I obtained my data in two ways. First, I conducted a heads up count where I methodically counted the number of parcels inside the corridor (yellow) or within the 400ft buffer (orange). I then utilized the TIGER files (and compared it with the assessors' files), created an intersection with the buffer and then the corridor, and determined the number of houses and parcels.

The amount of houses and parcels were nowhere near the result from my heads up count. I decided to use my heads up count for my analysis for a number of reasons:  The imagery was much older than the assessors' files and the Census data was close to 10 years old, what constituted a parcel was not known, and there were many structures on the map that might have been houses, garages, barns, sheds, etc. Additionally, in some of the more wooded areas, it was impossible to see structures due to the trees and shadows.

One of the important lessons learned for all maps produced was to make sure all layers had the same geographic reference system and projection. Additionally, the units of measure were required to be imperial, so any metric unit had to be converted to feet, miles, etc.

Homes and parcels within the study area. The inset map shows the full corridor in a smaller scale
in order to orient the viewers. The symbols are consistent with regard to type and color. I have also
included a comparison between the heads up counts and the assessor counts.


Criteria 1--The Environment

Four criteria were researched, analyzed, and mapped:

Environmental Impact.  By using a topographic map and downloading shapefiles from the National Wetlands Inventory, I plotted all sensitive environmental areas on my map. I added all required shapefiles and created a 400ft buffer around the preferred corridor. The Study Area and Preferred Corridor feature classes were the base from which all other maps were produced.

Once all the feature classes were populated on the map, I was then able to utilize GIS tools to determine the number of areas and acres impacted by the corridor. The requirements and goal of the study was to protect wetlands, route the corridor through disturbed land, and sustain the aesthetics of the area.

Throughout my project, I retained consistent symbology to avoid confusion. I also color coded the map borders to categorize them based on criteria.

Macro View of Environmental Map


This is one of many environmental maps and graphs produced to demonstrate the
impact of the transmission line on the environment.


Friday, January 31, 2020

Lab 4--Vector Analysis Part I and II

This was an interesting and fun lab. It is important to understand the difference between a feature class and shapefile. A feature class resides inside a geospatial database. Though the feature class can contain shapefiles, all elements of a shapefile must have the same geometry (point, line, or area).

An attribute table is a powerful tool that must be learned. An attribute or location query is the starting point to select or exclude specific criteria and modify the feature class to portray the desired results. As an example, a realtor might develop a query to select all houses 500 meters beyond a flood zone (or remove all houses within 500 meters), within 5 miles of a school, and within 10 miles of a fire station. The resulting output produces prospective houses meeting the buyer's criteria. Variations of this function include intersecting features (feature is partially in the area), joining tables (includes features of both tables), and producing compound (multi-ring) or variable buffers (different features have different distances from an area). An alternative to the aforementioned processes is to perform a union.

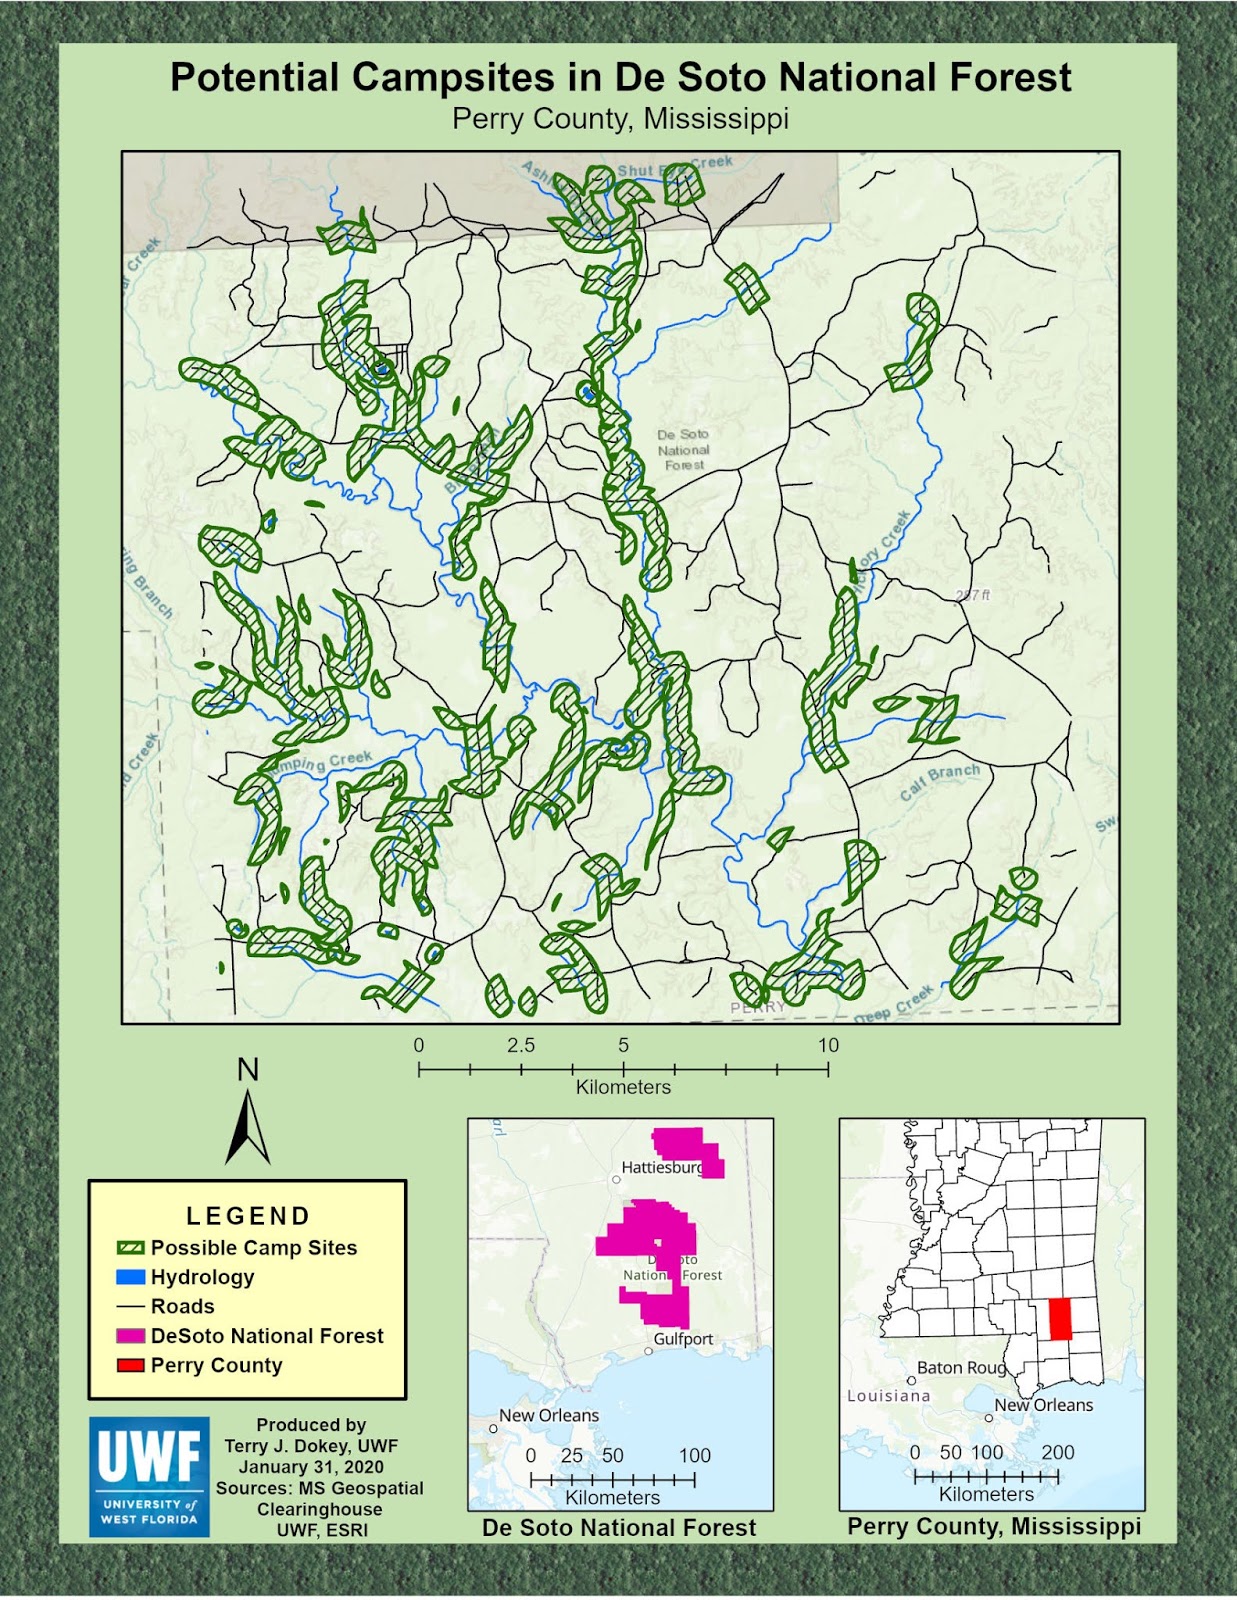
To produce my final product, I imported database files from the Mississippi Geospatial Clearinghouse. With this data, I could isolate MS counties and select the De Soto National Forest (near Hattiesburg, MS). Not only did I import new feature classes, but I also built my layers, produced buffers, intersections, joins, and exclusions. The resulting map depicts potential campsites in the forest, with selections depicting areas outside the buffer of drain basins, rivers, lakes, sensitive land areas, etc. 

I designed the overall map  to appeal to outdoor-oriented persons. I added two inset maps to orient the viewer to the location of the National Forest and Perry County. All essential elements of the map were input (north seeking arrow, name/date, credits, scale, neat line, etc.) to ensure the map was easy to read and understand, uncluttered, and accurate. 

Specific Map Elements:
--Legend: Displays all features of the map and inset maps with standardized colors.
--Colors:
   -Hatched green--potential camp sites (intersection of water/road buffer join and sensitive areas).
   -Blue--all hydrology.
   -Black lines--Roads
   -Red--Perry County
   -Pink--De Soto National Forest
--Map Scale: Specific for each map based on most effective display.
--Scale Bar: Even number of kilometers (projection based on meters) and suitable for the size of the area.
--North Area: Map north. I did not use true north because I would have had to have a different arrow for each map or the maps may have been rotated in odd directions. Map north is easier to view and understand.
--Titles: Explain the purpose of the overall map and the location.

Though this lab continues to build proficiency, there are some lessons:
--Always ensure your selections are cleared before executing another selection-type process.
--Make sure your drawing order is arranged properly so you can modify features on a particular layer.
--Be prepared to change your database format in the event that it is wrong or outdated (File>Options or Metadata>Update, respectively).
--When modifying a feature class, make a copy (and rename it) so its original content can be added to another layer.
--Once you begin making your map, do not move your database files or rename them. Your map will be affected negatively. Be careful on what files you delete as some may be more necessary than you thought.


Lab 4--Vector Analysis Lab Showing Potential Campsites
within the De Soto National Forest, Hattiesburg, MS.
Update to this Lab: I neglected to set parameters for different classes of campgrounds. Therefore, if you use this as an example, be advised, that I missed this point in the instructions. Just make sure you set up some parameters to delineate different types/qualities of campgrounds based on the terrain.